These are my notebook notes on Linux user administration, part of LINUXtips’ Linux for Cloud Native course, within the PICK 2026 track. I’ve cleaned it up here because writing solidifies the content, and because one day this will become a quick reference when I can’t remember a flag.
The outputs presented are examples. UIDs, names, and paths may vary depending on the system.
UID: the real identity of a user
Linux doesn’t see users by name. Internally, everything is controlled by the UID (User Identification), a number.
The user’s name is just a friendly label for us, humans. The system, processes, and file permissions work with the number.
This becomes clear with the id command:
idOutput:
uid=1000(user) gid=1000(user) groups=1000(user),10(wheel),975(docker)Comparing with the root user:
id rootOutput:
uid=0(root) gid=0(root) groups=0(root)root will always have UID 0. No other user should have this number.
/etc/passwd: the system’s user registry
The /etc/passwd file stores the list of all system users.
cat /etc/passwdOutput (one line, as an example):
user:x:1000:1000::/home/user:/usr/bin/zshEach line is divided into seven fields, separated by :
name:password:UID:GID:GECOS:home directory:shell| Field | Meaning |
|---|---|
user | User name |
x | Indicates the password is stored in another file (/etc/shadow) |
1000 | UID — unique user identifier |
1000 | GID — primary group identifier |
user | GECOS — any information about the user (full name, phone number, etc.) |
/home/user | User’s home directory |
/usr/bin/zsh | User’s default shell |
The x in the second field doesn’t mean there’s no password. It means it’s no longer here — decades ago the hash was directly in /etc/passwd, which any user could read. Today it resides in /etc/shadow, readable only by root.
Also, notice the UID and GID numbers:
- First system users (service accounts, automatically created) receive low UIDs.
- The first human user created usually receives UID
1000.
/etc/group: the system’s groups
Just as /etc/passwd lists users, /etc/group lists all groups.
cat /etc/groupOutput (example):
wheel:x:10:user
docker:x:975:user
user:x:1000:
Creating a new user: adduser x useradd
There are two commands to create users, and the difference between them matters.
useraddis the native, low-level command. It creates the entry in/etc/passwd, but does not create the home directory, does not ask for a password, and does not configure anything beyond what is explicitly passed. It’s dry and direct — perfect for scripts and automations, where you want to control every detail.adduseris an interactive script that runs on top ofuseradd. It asks questions, creates the home directory, copies default files from/etc/skel, sets the password, and configures the shell. To create human users for day-to-day use, I useadduser. For automation, I useuseraddwith explicit flags.
Creating with adduser
sudo adduser javaThe command interactively asks for the full name and other information (the so-called GECOS field):
Full Name []: Java Git
Room Number []: 900
Work Phone []: 987654321
Home Phone []: 123456789
Other []: Corinthian fan
Checking the result in /etc/passwd:
cat /etc/passwdOutput:
java:x:1002:1002:Java Git,900,987654321,123456789,Corinthian fan:/home/java:/bin/bashThe GECOS field concatenates all answers into a single string, separated by commas:
Java Git,900,987654321,123456789,Corinthian fanAnd adduser already took care of everything: it created the home directory, copied /etc/skel, and configured the default shell (/bin/bash), without me needing to pass any flags.
Creating with useradd
With useradd, every detail needs to be manually provided:
sudo useradd -u 1234 -g 0 -d /tmp/lore -s /bin/sh lore| Flag | Meaning |
|---|---|
-u 1234 | User’s UID |
-g 0 | Primary group’s GID |
-d /tmp/lore | Home directory |
-s /bin/sh | Default shell |
lore | User name |
Result in /etc/passwd:
cat /etc/passwdOutput:
lore:x:1234:0::/tmp/lore:/bin/shThe GECOS field was left empty because I didn’t pass any information to it.
Furthermore, the home directory was not created:
ls /homeOutput:
estudante javalore does not appear. useradd, without anything else, just writes the line in /etc/passwd — it doesn’t create folders, it doesn’t copy anything.
The -m flag: automatically creating the home directory
For useradd to create the home directory, the -m flag must be passed:
sudo useradd -u 3881 -g 1000 -m -d /home/intel -s /bin/sh intelThe -m flag automatically creates the user’s home directory, copying the contents of /etc/skel into it.
ls /homeOutput:
estudante intel javaNow intel appears.
Setting the password with passwd
A newly created user doesn’t have a password set. To configure it:
sudo passwd intelOutput:
New password:
Retype new password:
passwd: password updated successfully
Switching users with su
The su (switch user) command allows you to assume another user’s session in the terminal.
su - intelOutput:
Password:The dash (-) after su initiates a complete login session — loading the target user’s environment variables, as if they had logged in directly, instead of just inheriting the current user’s environment.
Checking the identity within the new session:
idOutput:
uid=3881(intel) gid=1000(estudante) groups=1000(estudante)To return to the previous user:
exitOr by pressing Ctrl + D.
/etc/adduser.conf: configuring default behavior
adduser reads its default configurations from a file:
vim /etc/adduser.confIt defines, among other things, the UID range reserved for “system” users (service accounts, not human):
FIRST_SYSTEM_UID=100
LAST_SYSTEM_UID=999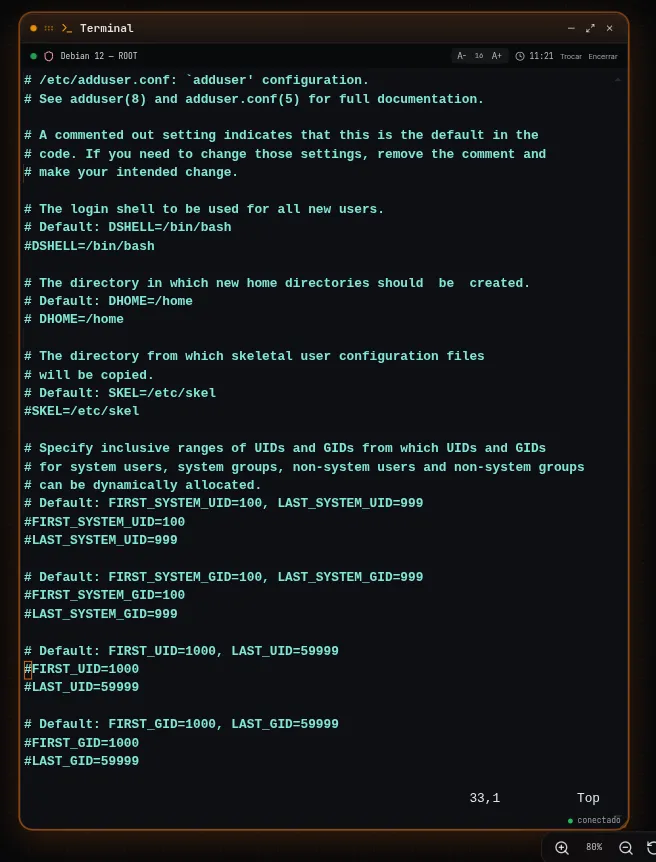
That is: UIDs between 100 and 999 are reserved for the system. Human users created thereafter start at 1000, as we saw above.
/etc/skel: the template for new users
/etc/skel is a directory that functions as a template for every new user created in Linux.
Its typical content consists of standard dotfiles — .bashrc, .bash_profile, .profile and, in some distros, .bash_logout or a .config folder.
By editing any of these files within /etc/skel, every new user created thereafter automatically receives these defaults, copied into their own home directory.
The path used as a template is configurable via the SKEL variable, defined in:
/etc/default/useraddRemoving a user: deluser / userdel
To remove a user:
sudo deluser pythonThis removes the user but keeps the home directory intact.
To also remove the home directory:
sudo deluser -r pythonLocking and unlocking an account
Sometimes we don’t want to delete the user, just temporarily prevent access.
sudo passwd -l javaThe -l (lock) flag locks the account password, without deleting the user or their data.
To unlock:
sudo passwd -u javaThe -u (unlock) flag re-enables access.
/etc/shadow: where passwords really live
/etc/shadow is the file that stores user password hashes. Unlike /etc/passwd, it requires root privileges to be read:
sudo cat /etc/shadowOutput (one line, as an example):
java:$6$4vSalt$hashaquiofuscado...:20033:0:99999:7:::Each line has nine fields, separated by :
user:password:last_change:min:max:warning:inactivity:expiration:reserved| # | Field | Meaning |
|---|---|---|
| 1 | User | Account name |
| 2 | Password | Password hash (! or * = account locked, empty = no password) |
| 3 | Last change | Days since 01/01/1970 of last password change |
| 4 | Min | Minimum days that must pass before changing again |
| 5 | Max | Maximum days until password expires |
| 6 | Warning | Warning days before password expires |
| 7 | Inactivity | Days after expiration until account is disabled |
| 8 | Expiration | Date (in days since 1970) when the account expires |
| 9 | Reserved | Unused field |
Identifying the hash algorithm
The prefix in the password field indicates which algorithm was used:
| Prefix | Algorithm |
|---|---|
$6$ | SHA-512 |
$y$ | yescrypt |
$2b$ | bcrypt |
An account locked with passwd -l appears with a ! at the beginning of the password field, in front of the original hash — the password is still there, but unusable for authentication.
chage: managing the expiration policy
chage (change age) manages an account’s password expiration policy.
Executed without options, it enters interactive mode, asking for each value:
sudo chage javaConsulting the current policy
sudo chage -l javaOutput:
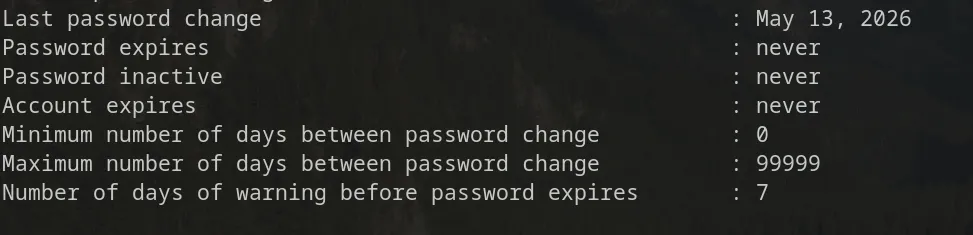
The -l flag lists the current account expiration information. Consulting your own account does not require root privileges.
Main flags
| Flag | Meaning |
|---|---|
-l | Lists expiration information |
-E date | Account expiration date (YYYY-MM-DD), or -1 to never expire |
-M days | Maximum password validity days |
-m days | Minimum days between password changes |
-W days | Warning days before password expires |
-I days | Inactivity days after expiration until account is disabled |
-d date | Date of last password change (-d 0 forces change on next login) |
Examples
sudo chage -l javaShows the current policy for user java.
sudo chage -M 90 -W 7 javaMakes the password expire in 90 days, warning 7 days prior.
sudo chage -E 2026-12-31 javaMakes the account expire on 12/31/2026.
sudo chage -d 0 javaForces password change on next login.
Expiring the password directly
There’s also a shortcut via passwd:
sudo passwd -e javaThe -e flag expires the password immediately, forcing a change on next login — equivalent to chage -d 0.
Command summary
| Situation | Command |
|---|---|
| View a user’s identity (UID/GID) | id |
| View system users | cat /etc/passwd |
| View system groups | cat /etc/group |
| Create user interactively, with home | adduser |
| Create user with explicit control | useradd |
Create home automatically with useradd | useradd -m |
| Set/change password | passwd |
| Switch user (full session) | su - user |
| Remove user | deluser / userdel |
| Remove user and their home | deluser -r |
| Lock/unlock account | passwd -l / passwd -u |
| View password hashes (root) | cat /etc/shadow |
| View/set expiration policy | chage |
| Force password change on next login | passwd -e or chage -d 0 |
Conclusion
/etc/passwd and /etc/group answer “who is who” on the system. /etc/shadow stores what truly protects these accounts — and that’s why only root can read it.
adduser and useradd fundamentally do the same thing: write a line in /etc/passwd. The difference is how much each automates for you. Day-to-day, adduser saves work; in scripts, useradd with explicit flags ensures predictability.
And chage closes the cycle: it’s not enough to create the account and set a password, you need to decide how long that password remains valid, and what happens when it expires.
Next notes: groups and permissions (chmod, chown, umask), sudoers, and package management.
References
- GNU/Linux
shadow-utils— project that maintainsuseradd,userdel,passwd, andchage. man 5 passwd,man 5 shadow,man 5 group— official documentation for file formats.man 8 useradd,man 8 chage— official documentation for the commands.- Debian Administrator’s Handbook — Managing Rights — reference for
adduser,/etc/skel, and account management. - LINUXtips — Linux para Cloud Native — course used as the basis for my studies and these notes, within the PICK track.