From VM to EC2: Three Practical Linux Challenges for Cloud Native
Truly studying Linux goes far beyond memorizing commands. The most important part is understanding where each command fits into a real workflow.
In the first three challenges of the Linux for Cloud Native training, I set up a small hybrid environment with a local VM and an EC2 instance, organized the application following an FHS-inspired structure, transferred files with rsync, edited code directly on the server, and monitored logs in real time.
In this post, I document the main steps, the errors that came up, and what I learned at each stage.
Security Note: IP addresses and other infrastructure information have been redacted in the images before publication. Private keys, tokens, and passwords should never appear in screenshots or repositories.
Challenge 1 — Hybrid Setup with VM, EC2, and SSH
The first goal was to prepare two Linux environments:
- a local Ubuntu VM;
- an Ubuntu instance on AWS EC2;
- SSH access to both environments;
- aliases in the
~/.ssh/configfile; - key-based authentication;
- package updates on both servers.
The idea was to avoid huge commands like:
ssh -i ~/.ssh/minha-chave.pem usuario@endereco-do-servidorWith aliases configured, access became simpler:
ssh vm
ssh ec2
An example of a secure configuration would be:
Host vm
    HostName VM_ADDRESS
    User vm-user
    IdentityFile ~/.ssh/id_ed25519

Host ec2
    HostName EC2_ADDRESS
    User ubuntu
    IdentityFile ~/.ssh/ec2-key.pem
The real HostName values should not be published.
Validating the Environments
After connecting, I used simple commands to confirm which machine I was on:
whoami
hostname
pwd
I also ran package updates in both terminals:
sudo apt update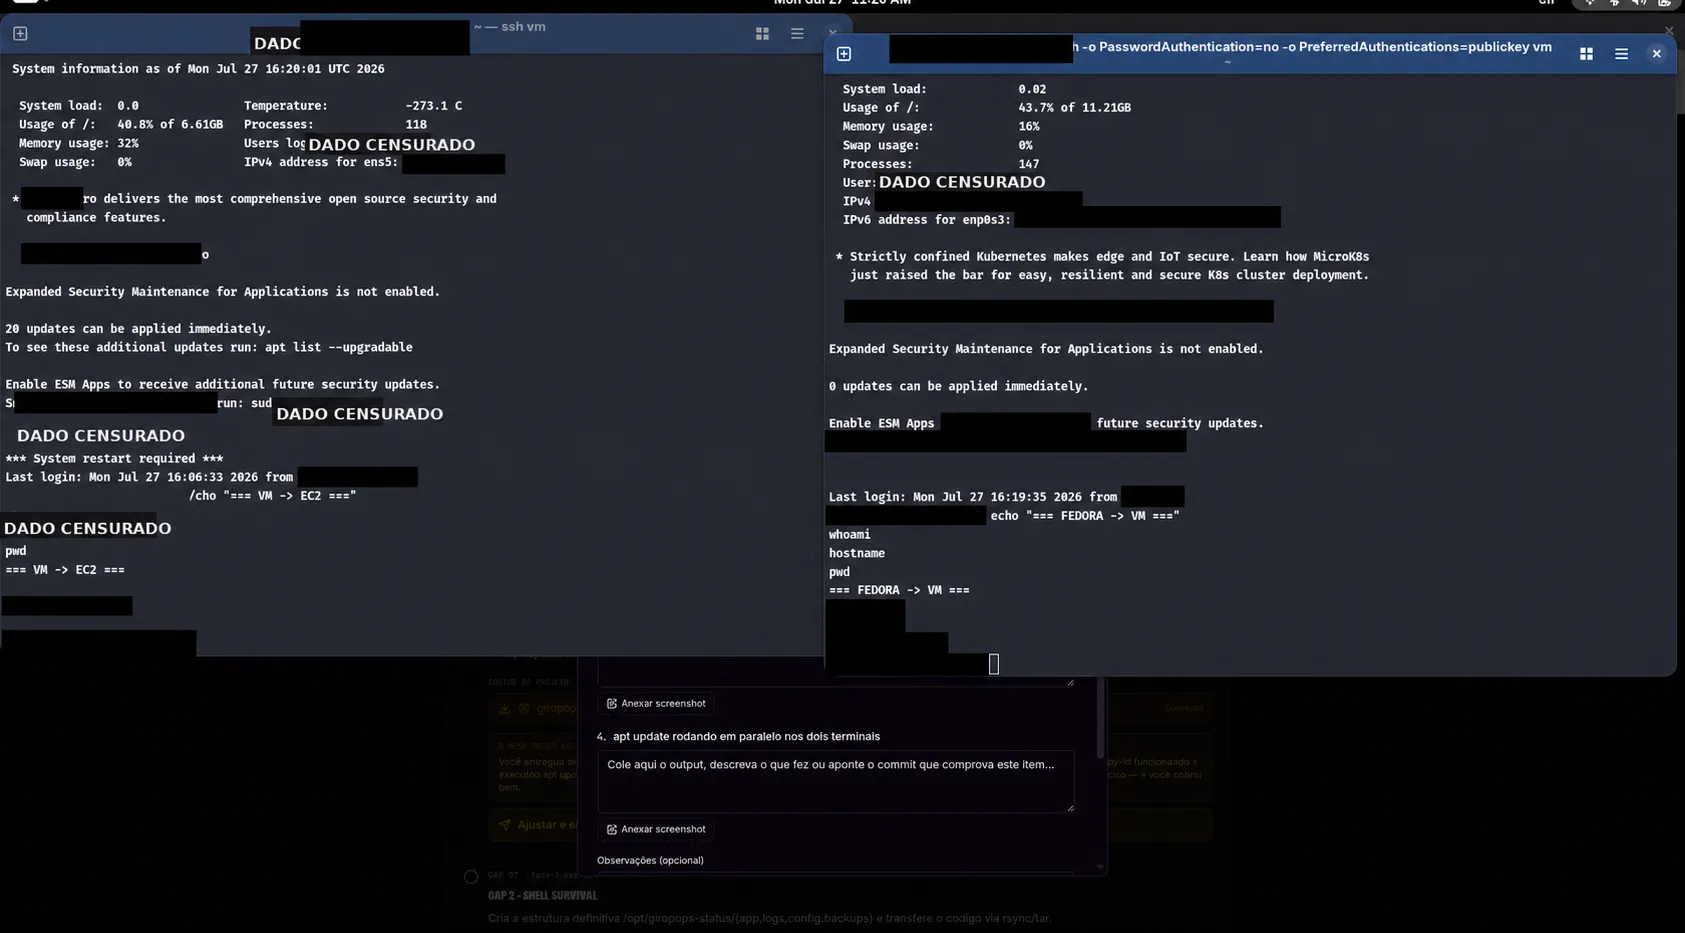
What I Learned
The ~/.ssh/config file is not just a convenience. It centralizes connection parameters and reduces errors when accessing different machines.
It also became clearer that:
- the local VM and EC2 are independent environments;
- each machine has its own users, processes, and filesystem;
- a private key should only remain on the authorized computer;
- the key file must have restricted permissions, usually
chmod 600; - host names, public IPs, tokens, and key content should not appear in posts or screenshots.
Challenge 2 — Shell, FHS, Directories, and Transfer with rsync
In the second challenge, I prepared a structure for the giropops-status application in /opt.
The created structure was:
/opt/giropops-status/
├── app/
├── backups/
├── config/
└── logs/
The command used was:
sudo mkdir -p /opt/giropops-status/{app,backups,config,logs}The -p option makes mkdir create intermediate directories when necessary and not return an error if they already exist.
Then, I adjusted the ownership of the directories:
sudo chown -R "$USER":"$USER" /opt/giropops-statusChecking with ls -lah
To validate the structure, I used:
ls -lah /opt/giropops-statusEach option has a function:
-l: displays a detailed listing;-a: includes hidden files;-h: presents sizes in human-readable format, such as4Kand32M.
Transferring the Application
I used rsync to transfer files between environments:
rsync -av origem/ destino/The main options were:
-a: archive mode, preserving important attributes;-v: verbose mode, showing processed files.
In another step, I packaged the files and transferred the compressed archive:
tar -czf /tmp/giropops-app.tar.gz .
rsync -avz /tmp/giropops-app.tar.gz ec2:/tmp/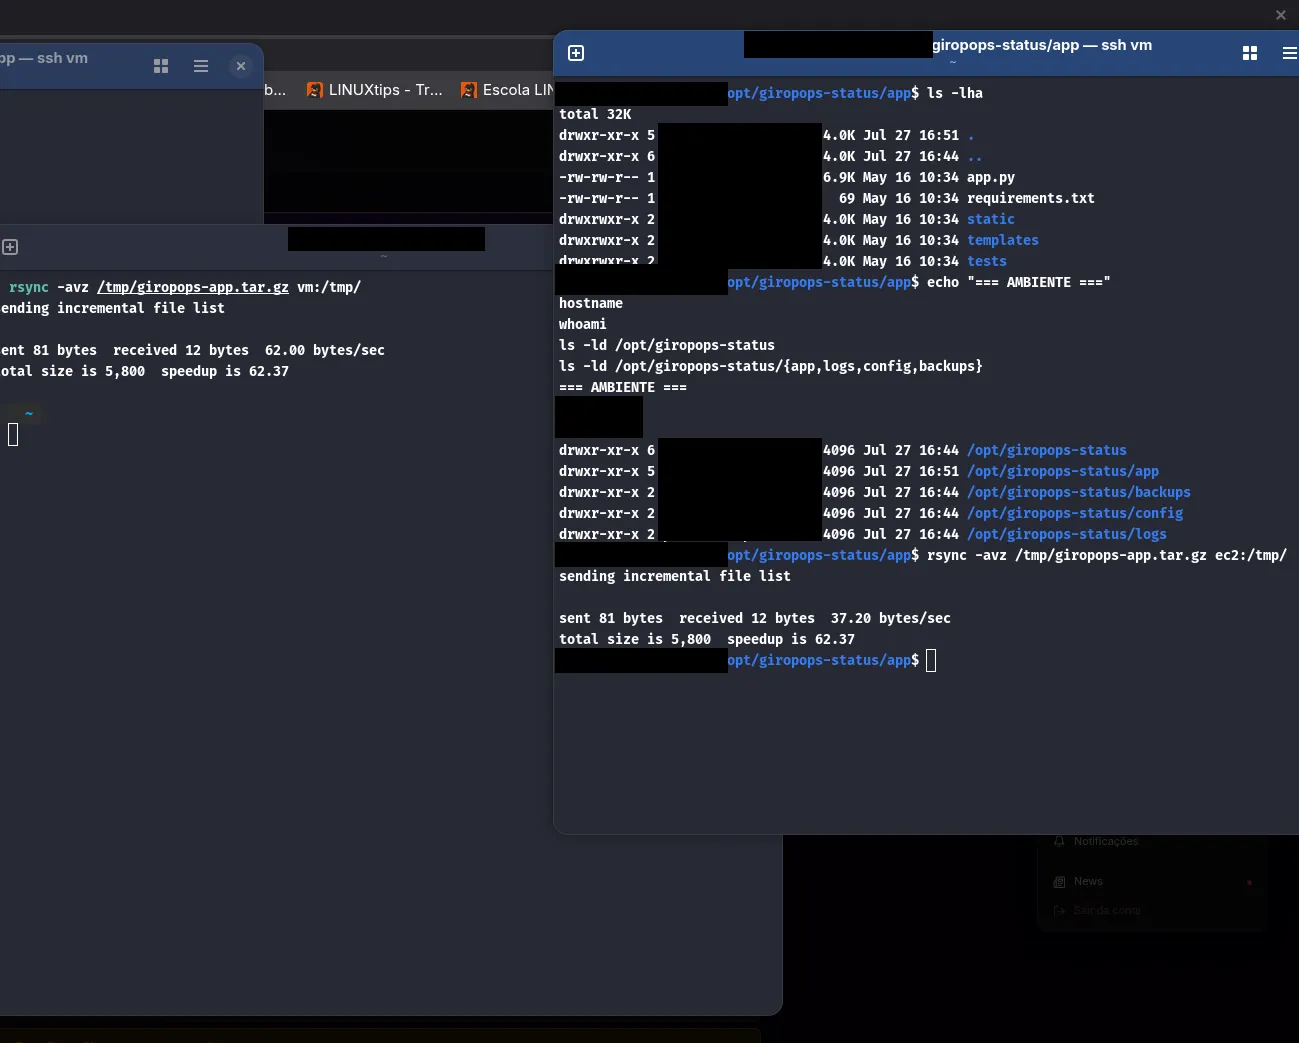
The Trailing Slash Detail in rsync
An important lesson was the difference between:
rsync -av pasta/ destino/and:
rsync -av pasta destino/With the trailing slash, rsync copies the content of folder. Without the slash, it copies the directory itself into the destination.
It’s a small character with the potential to create a directory tree worthy of a sci-fi movie.
Challenge 3 — Vim, VS Code Remote SSH, and Real-time Logs
In the third challenge, I worked with file editing directly on the server.
The main tasks were:
- navigate through code with
less; - search for functions within the file;
- change
APP_VERSIONusing Vim; - install a
.vimrc; - edit the
<title>via VS Code Remote SSH; - create a Python virtual environment;
- install and start Redis;
- run the Flask application;
- monitor logs with
tail -f.
Navigating with less
To open the file:
less app.pyInside less, I searched for a function by typing:
/def check_serviceThe shortcuts used were:
n: next occurrence;N: previous occurrence;q: quit.
I also listed the environment variables expected by the application:
grep '^[A-Z_]* = os.environ' app.pyChanging the Version with Vim
I opened the file directly on the server:
vim app.pyIn Vim, I changed the default value of APP_VERSION, saved, and exited with:
:wqThen I validated the change:
grep -n 'APP_VERSION' app.pyConfiguring .vimrc
The exercise package included a didactic file:
cp /opt/giropops-status/app/dotfiles/vimrc.example ~/.vimrcThe configuration enabled features such as:
set number
set tabstop=4
set shiftwidth=4
set expandtab
set autoindent
syntax on
filetype plugin indent on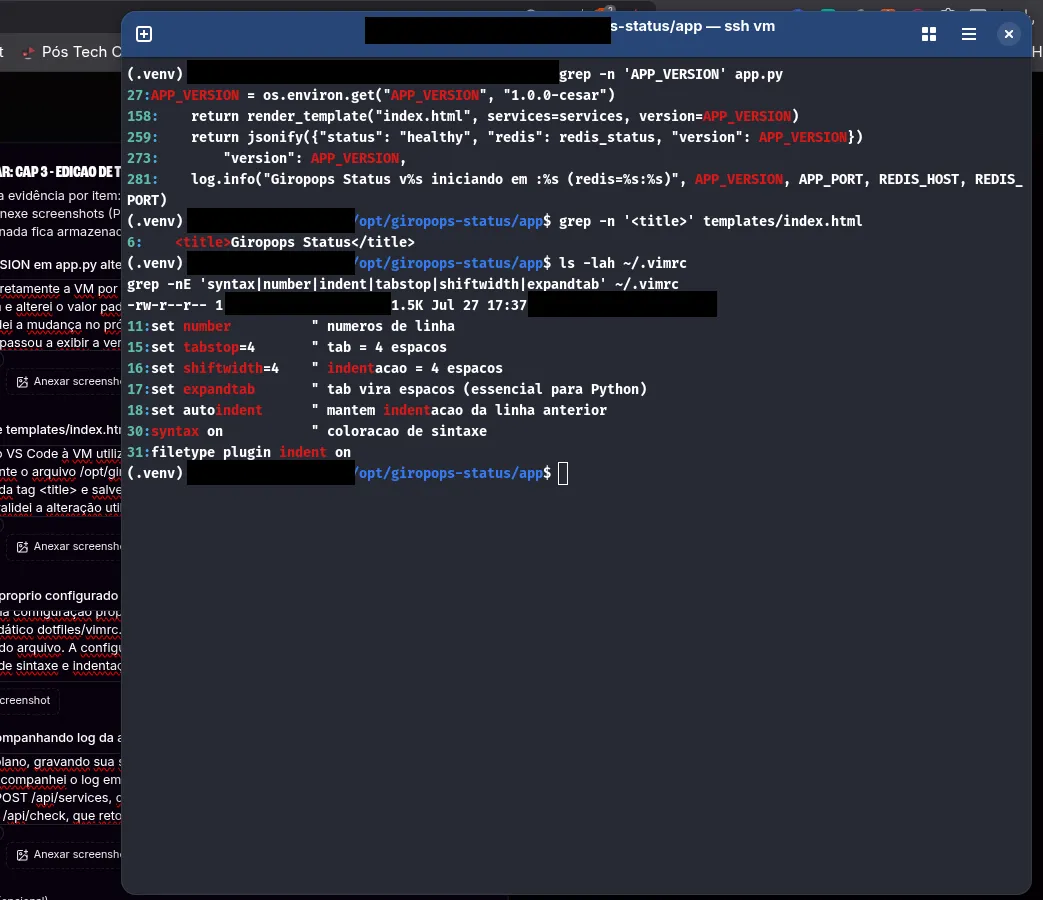
Remote Editing with VS Code
On my local computer, I installed the Remote - SSH extension by Microsoft.
Then:
- opened the command palette with
Ctrl+Shift+P; - selected
Remote-SSH: Connect to Host; - chose the
vmalias; - opened
/opt/giropops-status/app; - edited
templates/index.html; - saved the change directly on the VM.
The integrated VS Code terminal was already connected to the server, so I validated with:
hostname
pwd
whoami
grep -n '<title>' templates/index.html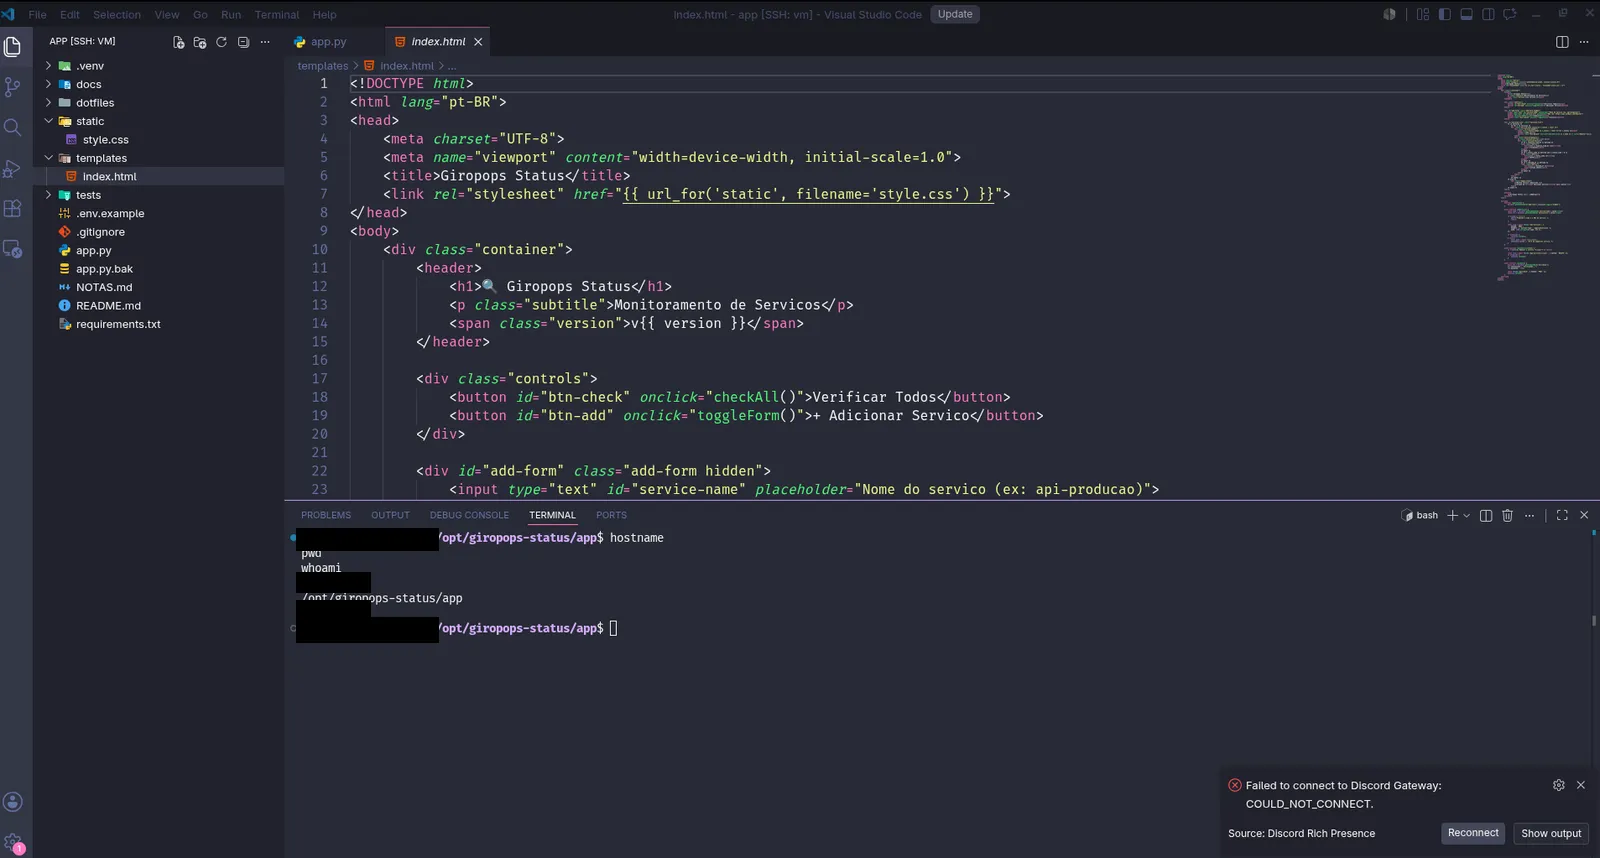
Python, Redis, and Virtual Environment
I created a virtual environment to avoid installing dependencies in the system’s Python:
cd /opt/giropops-status/app
python3 -m venv .venv
source .venv/bin/activate
python -m pip install -r requirements.txt
I confirmed the active interpreter:
which python
which pip
python --version
For the application’s storage, I installed Redis:
sudo apt install -y redis-server
sudo systemctl enable --now redis-server
redis-cli ping
The expected return was:
PONGConfigurable Logging and tail -f
The updated version of the application accepts the variables:
LOG_FILE=/tmp/giropops-logs/app.log
LOG_LEVEL=INFO
I started the application in the background:
mkdir -p /tmp/giropops-logs

LOG_FILE=/tmp/giropops-logs/app.log LOG_LEVEL=INFO python3 app.py &
In another terminal, I monitored the file in real time:
tail -f /tmp/giropops-logs/app.logTo filter only check events:
tail -f /tmp/giropops-logs/app.log |
grep --line-buffered -i 'check'
I also tested the API routes:
curl -X POST   -H 'Content-Type: application/json'   -d '{"name":"google","url":"https://google.com"}'   http://localhost:5000/api/services

curl -X POST http://localhost:5000/api/check
The application returned HTTP 201 for registration and HTTP 200 for verification, marking the service as UP.
When I finished, I exited tail with Ctrl+C and stopped the application in the terminal where it was started:
kill %1Errors That Appeared Along the Way
Not everything worked on the first try — and that was one of the best parts of the lab.
The vimrc.example file did not exist on the VM
The first attempt returned:
cp: cannot stat '.../vimrc.example': No such file or directoryThe file existed in the local project but had not been synced to the VM. The solution was to locate the file and copy the dotfiles folder again.
The virtual environment was not created
Python reported that ensurepip was not available. I installed the necessary packages:
sudo apt install -y python3-venv python3-full
rm -rf .venv
python3 -m venv .venv
Port 5000 was already in use
When starting a second instance of the application, Flask responded:
Address already in use
Port 5000 is in use by another program.
I identified the process:
sudo ss -ltnp | grep ':5000'
jobs -l
And terminated the previous instance:
kill %1LOG_FILE did not work in the old version
The LOG_FILE variable did not create the file because the initial app.py did not yet implement FileHandler.
I confirmed with:
grep -nE 'LOG_FILE|LOG_LEVEL|FileHandler|basicConfig' app.pyAfter syncing the updated version, the code began to configure logging correctly.
Conclusion
These three challenges connected several concepts that are usually studied in isolation:
- SSH and key-based authentication;
- local VM and cloud infrastructure;
- Linux filesystem and directories in
/opt; - file transfer with
rsync; - editing with Vim and VS Code Remote SSH;
- dependency isolation with
venv; - Redis as a system service;
- configurable logs;
- process and port diagnostics.
More than just executing commands, the exercise showed a routine close to real work: preparing servers, transferring applications, editing files remotely, validating services, and investigating errors.
It’s at this point that the terminal stops being just a black screen and starts becoming an engineering tool.